Detalles
Delivery Time: 1~24 hours
Official download:Please click here >>
Gilisoft Screen Recorder is a screen recording software for Windows, it captures what you see on screen and what you hear/say simultaneously, and saves them as compressed video file in real-time. Instead of recording screen in a single monitor, there are times that you may want to capture screen activity on dual or multiple monitors that connected to your computer. With the screen recording software you can record webinars, games and Skype videos in HD, and much more in a quick and hassle-free way. The intuitive and easy-to-use software offers a complete suite of tools and options for professional screen capture.
Exclusive Features of Screen Recorder
Record Screen and Webcam
It can record the entire screen (support multiple monitors), single window or the area of screen your select. It also can record video from wecam or record screen and webcam at the same time.
Achieve High-Quality Recordings
Recording high-quality audio and video can sometimes be NOT a challengere. With it you can create professional-like video tutorials and screencasts.
Recording Mic and Computer
Screen Recorder can record video with computer sounds, record video with microphone or record screen with audio from your microphone and speakers.
Zoom In While Recording
Ever seen tutorials and impressed they are able to zoom in and out whilst recording? Screen recorder can adjust the recording area magnify the area of cursor during recording (Maximum 4X).
H264 GPU Acceleration Encoding
Optimizes recording performance by using a hardware-accelerated H.264/HEVC encoder. It will allow you to record the target in high speed, with a high compression ratio and excellent quality.
Popular Video Output Formats
You have a wide selection of different HD popular video formats: MP4, AVI, WMV, FLV, H264 and more. Choose the one that best fits your needs.
Draw on Video/Add Logo to Video
For placing your own logo image on the video for showing who the creator is, you can record video with text watermark or image watermark. Draw on the video during the recording process. Add important drawings to your tutorials and make videos more engaging.
Capture Snapshots
Screen Recorder can take desktop High Quality screenshots and save file as PNG, JPG, BMP format whether or not you start recording video.
Recording Schedule
With this feature, you can set the time to start a recording, as well as the conditions (for example, time, file size, recording length) to stop a recording. It includes an advanced time triggered recording which gives you the power to schedule recording either for a website or anything that runs on your desktop to start or stop at a certain time. Using this feature, recording are made automatically on the Once, Daily and Weekly you choose.
Countdown Recording & Auto-Stop Recording
Countdown recording is designed to help you prepare for your recording and provide confirmation that your recording has successfully started. What is Auto-Stop Recording? Sometimes you want to record a 1 hour webinar that already started while you go to do something else. It help you don't need to remember to turn it off manually.
Hot Keys
Easily use hotkeys to start, pause ,stop recording video , capture screenshot and use hotshot function.
Cursor and Click Effect
Embed mouse cursor in recording, mouse click sound effect, and mouse click effect.
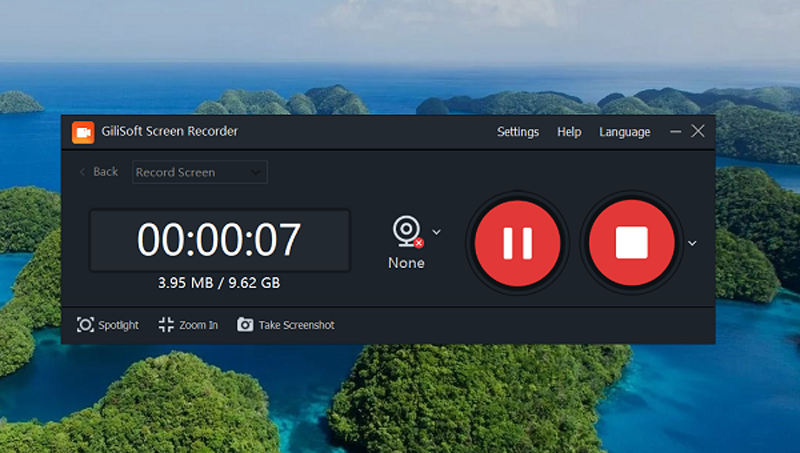
How to install Gilisoft Screen Recorder?
1. Download GiliSoft Screen Recorder from the button below: Gilisoft Screen Recorder
2. After downloading, please run the setup file, then follow the wizard to complete installation
How to Record Webcam Video?
1. Choose your webcam in "Target" list .
2. Choose the webcam source size as you want.
3. For Audio, you can specify "None ", "Microphone", "Computer sounds", or "Computer sounds and microphone".
4. Click "Record" to start .
How to Record Full Desktop Screen?
1. Choose the "Full Screen" in "Target" list .
2. Set the audio source.
3. Set the output folder.
4. Click "Record" to record your desktop to a video file.
How to Record a Region of the Screen?
1. Select the "User-defined" mode. To select a region, click and drag on the screen.To select a window, hover your cursor and click when a blue border appears around the window.
2. Set the audio source.
3. Set the output folder.
4. Click on the "Record" button to start recording region.
How to Record Picture in Picture (Screen + Webcam)?
Enter the settings dialog box, enable "screen capture and webcam at the same time" and select the camera you want to use. If you need, please enable 'Hide camera window when recording'.
How to Zoom in while Recording?
Enter the settings dialog box, enable "zoom in while recording " and adjust the scale from 1.5 to 4.0 as you want. If you need, please change the open/close hot key. After start video recording, move the cursor to the area you want to zoom in, use hot key open or close zoom in function.
How to Record Video with text/image/animate watermark?
Enter the settings dialog, go to the Watermark section, write your text, click Add. If you need, you can adjust the transparency, set the position, enable scrolling.
Enter the settings dialog, go to the Watermark setting section, select your image, click Add. If you need, you can adjust the transparency, set the alignment, enable scrolling.
How to Record Audio with/without Microphone?
In general, you only need to select audio at the main interface.When recording video, sound is just as important as the visuals. You can specify "None ", "Microphone", "Computer sounds", or "Computer sounds and microphone" in the "Audio" drop-down menu.If you want to record both microphone and game sounds, please select the "Computer sounds and microphone". You can the adjust the recording volume of device you want to record.
Sometimes you need to test the audio equipment. Enter the settings dialog, just go the Audio setting section, click setting button to have a test. If you need, you can adjust audio quality.
How to Enable/Disable Capturing Mouse Cursor?
In "Settings" window, just go the the "Cursor", you can check or uncheck the "Embed mouse cursur in recording". You also can set "Mouse click sound effect" and "mouse click effect" of left click/double click
How to Adjust the Quality of Recording Video?
In "Settings" window, just go the the "Video" setting section, please choose H264 format and check 'Enable GPU Acceleration'. If you need you can Adjust the Quality of Recording Video.
How to Schedule Auto Recording ?
You are able to set the time to start a recording, as well as the conditions (for example, time, file size, recording length) to stop a recording.
How to Capture Snapshots ?
First please check or reset the Hotkey to caputre snapshot. After recording video, you can use Hotkey to capture. And you change the image format, the output folder to save the snapshots.
How to Cut a piece of Video ?
Drag slider to set the start/end time.
How to Join Video Clips with/without Short Transitions ?
Check 'Merge all files into one' to enable video joining function.
Click 'Transition' to 'Transition Effect' setting dialog, you can choose one effect or set no transition.
How to Rotate a Video?
There’re clockwise, flip horizontal and flip vertical 3 options for you to rotate the video.
How to Crop a Video?
Drag the corner of the video frame or enter the specific width and height to set the crop area size. You can see the output preview simultaneously. .
How to Add Filter Effects to Video?
Set the start time you want to add filter effect, then click 'Add Filter Effect'.
Set the end time of filter effect and here you can also change the begin time, then select the effect and click OK.
How to Add Zoom Effects to Video ?
Set the start time you want to add zoom effect, then click 'Add Zoom Effect'.
Set the end time of zoom effect and here you can also change it's begin time, then ajust the zoom area and click OK.
How to Add Volume Effects to Video?
Set the start time you want to add volume effect, then click 'Add Volume Effect'.
Set the end time of Volume effect and here you can also change it's begin time, then ajust the volume and click OK.
How to Add Text Watermarks to Video?
Set the start time you want to add text watermark, then click 'Add Text Watermark'.
Set the end time of Text Watermark and here you can also change it's begin time, then input the text and click OK.
How to Add Image Watermarks to Video?
Set the start time you want to add image watermark, then click 'Add Image Watermark'.
Set the end time of Image Watermark and here you can also change it's begin time, then move the position and adjust size of Image Watermark and click OK.
How to Add Video Watermarks to Video?
Set the start time you want to add video watermark, then click 'Add Video Watermark'.
Set the end time of Video Watermark and here you can also change it's begin time, then move the position and adjust size of Video Watermark and click OK.
How to Add Shape Watermarks to Video?
Set the start time you want to add shape watermark, then click 'Add Shape Watermark'.
Set the end time of Shape Watermark and here you can also change it's begin time, then draw Shape Watermark and click OK.
How to Remove Audio from Video ?
Select None to remove audio from video.
How to Add Audio to Video?
Set the start time you want to add audio to video, then click 'Add Audio to Video'.
Set the end time of add audio to video and here you can also change it's begin time and click OK.
How to Add Voice to Video?
Set the start time you want to add voice to video, then click 'Add Vocie to Video'.
Set the end time of add voice to video and here you can also change it's begin time and click Record to record voice.
How to Adjust video speed ?
Adjust speed from 0.1~8X
How to Add Subtitle to video ?
Click '+' button to load subtitle or create subtile.
How to Get rid of Watermarks from video ?
Click 'Add watermark remover' button and adjust position to the watermark you want to get rid of.
- Sea el primero en dejar una reseña para este producto
Escribir su Propia Revisión
Sólo usuarios registrados pueden escribir sus opiniones. Conéctese o regístrese

